4/14-16/09 I went up to the property for 3 days: Tuesday through Thursday.
I stopped at Priscilla's and also at Marilyn's on the way up. I arrived at 12:50 and was promptly greeted by Bert and Ernie as usual. I had just gotten the 4WD fixed on the truck, which I learned had never worked since I owned the truck. That explains why I had never been impressed by 4WD over 2WD. Since there was still a considerable amount of snow on the driveway up to the trailer, I decided I would test the 4WD.
I drove as far up as I could in 2WD but as soon as the rear wheels got up on the snow, I was stuck. I put it in 4WD and had no trouble driving up through the snow and parking next to the trailer. I am now beginning to believe in the merits of 4WD.
I started a fire in the wood stove, had my lunch, hauled a bunch of firewood, and then went to work on the loft wiring. The plan was to get all the wood ready for varnish by Thursday so I could do my usual trick of varnishing and cleaning out my brush as the very last thing before I left for home on Thursday.
In order to get the wood ready for varnish, I needed to plug holes right away so that the glue would have time to set in time for me to plane or chisel the plugs smooth before Thursday morning. So the first thing to do was to plug all the holes.
I started with the half-inch hole I had inadvertently drilled all the way through the base of the Grid C2 RPSL on 4/7/09. The hole was pretty clean, so I made a tapered plug from a dowel, coated it with glue, and tapped it snugly into the hole.
Next I patched the hole further up the RPSL where the first hole I made, on 4/9/09, for the wire run to the loft stair light fixture, was too low. This was a 3/4" hole at a steep angle and it had splintered out quite a bit of wood. To fix it, I whittled an inlay about six inches long and about an inch or inch and a half wide and fit it into a chiseled recess around the hole in the RPSL. I used Gus's hunting knife to do the whittling.
When I was satisfied with the fit, I glued the inlay into the recess and bound it tightly to the RPSL with several tight turns of nylon mason's string.
Then I plugged the hole that came up into the recess for the loft stair light fixture. I picked up a vine maple stick I happened to see outside that looked like it would fit the hole nicely. I cut a section out of the stick and tried it, and sure enough, it fit perfectly. I glued and tapped the section into the hole.
Finally, I whittled another piece of wood and glued it into the hole I had drilled up from the loft light switch box, (Box D).
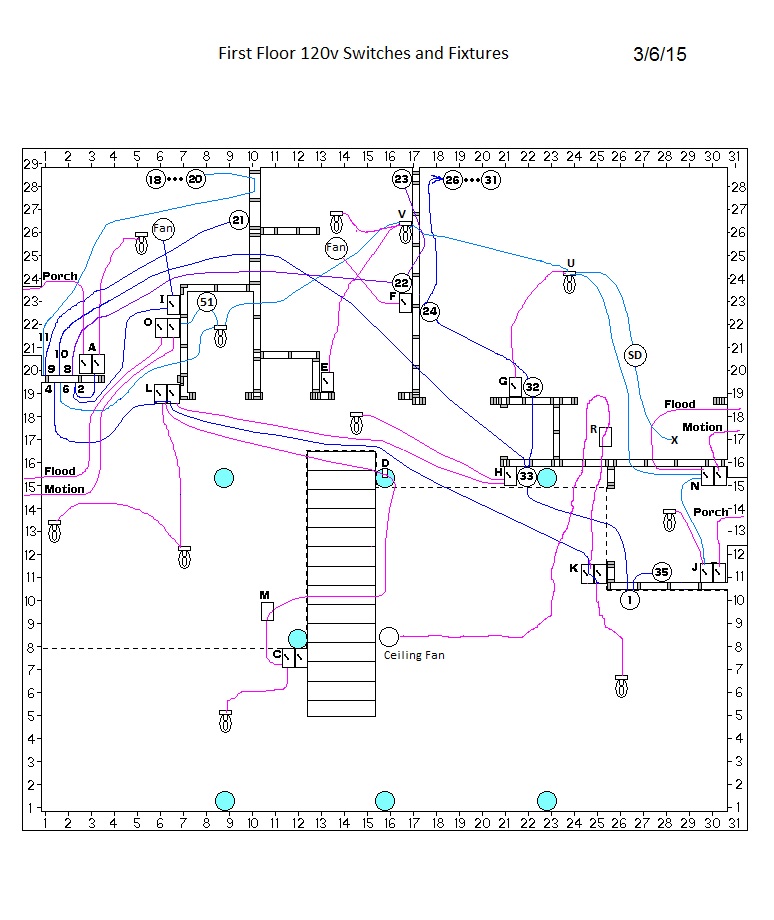
With the glue drying, I went to work installing Box D. I did some more chiseling on the channels for the wires to run from the holes they ran through, around the box to the back of the box where they entered the box through two cable clamps. The channels had to accommodate all the wires and the two clamps.
I clamped four short pieces of wire cable to the box to test the fit. After some more trimming of the channels, I was satisfied that they would work and I went to work stringing wire for record.
First I ran the end of a 100-foot length of 14-2 wire up over the Grid B,1.5 purlin about where the light fixture will go, and from there through knockouts in the rafters to the Grid A1 corner of the loft. Then I snaked the wire down through the holes and channels I had prepared in that corner and pushed a length of it down through the loft floor.
Then, under the loft floor, I knocked out several knockouts in the floor joists heading for the Grid C2 RPSL and strung the wire through these holes. I pulled enough slack so that I had enough wire to go up through the long hole in the RPSL up to Box D.
I went in for the night feeling good about making more progress than I had been making lately.
On Wednesday, Bert and Ernie came begging for dog biscuits before I had finished breakfast. After the three of us finished eating, I went up to the cabin, made a fire, got some more firewood, and then went back to work on the wiring.
I strung a 14-3 cable from the crawlspace up through the bathroom wall to the loft floor, and then over to the Grid C2 RPSL. That was the second of three wires that needed to go up through the column.
For the last wire, I chose a piece of 14-2 cable that would easily reach Box L from the RPSL.
I marked the ends of the three cables with their wire numbers so that I could identify them once I had snaked them up through the hole in the column. Then I taped the ends together and tried to push the three of them up through the hole. They wouldn't go.
The hole had some wood chips and sawdust in it, and it made a tricky turn at the intersection of the two holes I had drilled, so it took a little doing to snake a wire up through it. I succeeded in getting a single 14-2 cable up through the hole, so I used it to pull up the bundle of three cables.
First I stripped the end of the cable that I had in the hole and bared the three wires. Then I stripped about 3 inches of each of the three cables I was going to pull and I connected the ground wire of each one to one of the wires I had bared in my pulling wire. Then I taped up the joint, which made a nice smooth, small diameter, transition to the bundle of three cables.
I went up to the loft and pulled on my pulling wire and had no trouble pulling the bundle of three cables up and out of the Box D recess in the column. That was a major step of progress.
On 4/9/09 I had already prepared the wire and the pancake box for the light fixture on the column, so I snaked that wire down through the hole so it came out of the Box D recess. Now I had all four cables that need to enter the double size handy box. that would be Box D.
I arranged the cables in the order they would lie and pushed each one in turn back into its channel so I could mark the point on the cable where it would be attached to its clamp. With all four wires thus marked, I pulled them out of the recess and attached them to the box through the clamps. Since the wires all enter the recess near the front and then run to the back of the recess through the channels, there is about 8 or 9 inches of slack wire that can be pulled out of the recess to make it easy to clamp them to the handy box.
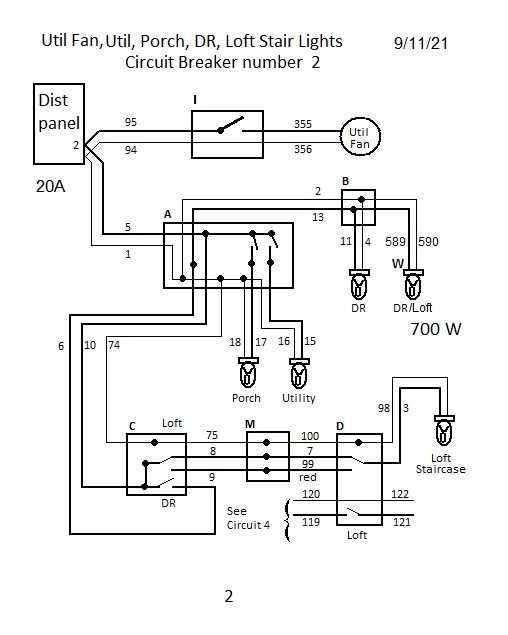
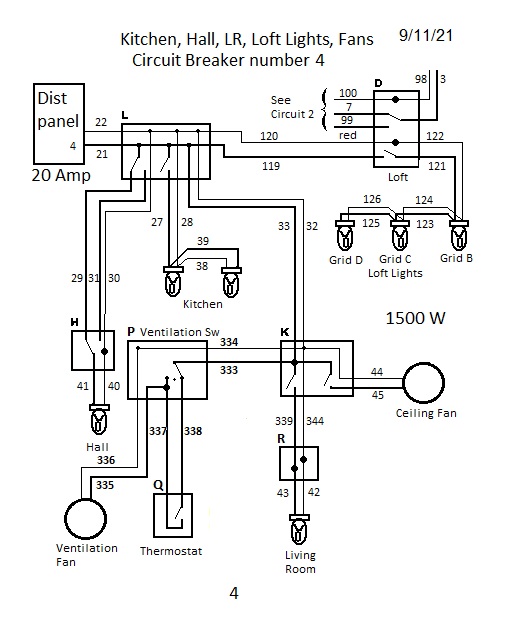
Then, when the box is shoved into the recess, those wires just lie back into their channels and the box goes all the way to the back of the recess. I finished the box installation by screwing the box to the log, labeling the wires, clamping one of the ground wires to the green screw, wire-nutting the four ground wires plus a pigtail and stuffing them to the back of the box, wire-nutting the white wires together in two pairs (they are parts of two different circuits, circuit number 2 and circuit number 4), attaching all the black and red wires to the double switch, and finally attaching the switch to the box. I tried the cover for fit, but I took it back off so I could varnish the new wood underneath.
Before I broke for lunch, I installed the pancake box for the light fixture, which amounted to nothing more than screwing the box to the column since all the wiring had already been done.
After lunch, I set the gate back up. This was the first time I had carried the scaffold frame that I use for that purpose up and down the new concrete staircase. Even though my knee was bothering me, the stairs made it easier and quicker than going around the roadway.
I had no trouble installing the gate. After doing it so many times, I know just how to rig the frame, the chain and the come-along to lift the log and get it to go down over the rebar pin with the minimum amount of moves and effort. I was thinking I might have to replace one or both gate posts, but I decided they will last at least another season.
Since I wanted to get the first coat of varnish on all the new wood exposed in installing the loft lights, the next priority was to cut the recesses in the purlins for the three loft light fixtures. I couldn't reach the one on the ridgepole without moving the scaffold tower, and I still needed the tower where it was to finish planing down the inlay on the RPSL. So I started with the other two on the Grid B and the Grid D purlins. I could reach them from a piece of plywood on top of two sawhorses.
I used the hole saws, hammers, and chisels to cut the two recesses.
Then, since the weather was perfect and this was an opportune time to work in the woods, I decided to measure to see how much more water pipe I needed to finish the waterline job. I wasn't sure I had enough pipe. I took a 100-foot tape into the woods and measured the run. It is 140 feet. Since I have three 60-foot coils of pipe, I have plenty.
Ernie found me in the woods and I got him a dog biscuit. Bert missed out on this one. It was a gorgeous day and very pleasant to be in the woods. The leaves aren't out yet so you can see everywhere, there are no mosquitoes out yet, and the snow is gone and the ground is dry. Very enjoyable.
On Thursday morning, I got the Bosch planer out and planed down the plug and the inlay on the column so they were both ready for their first coat of varnish. The plug looks just like a knot in the log, and the inlay will be nearly invisible unless you know to look for it.
With that done, I could move the scaffold tower. Before I did, I took a couple pictures of it to show how it hangs out in space. Then I moved the scaffold tower to the center of the room so I could reach the ridgepole, and I cut the recess for the light fixture in the ridgepole.
Next I got some sandpaper and went over the seven places where I needed to varnish: the two hole patches and two electrical boxes in the RPSL and the three recesses for fixtures under the purlins.
I had just gotten a brush and had opened a can of varnish when I heard Phil and Jeannie Leatherman drive up. They had come to get some water and to see what I was up to. We had a nice visit while I showed them what I had done. Jeannie was concerned for my knee and gave me some advice about wearing a brace. I told her that I had one and that I would consider wearing it if I felt I needed it.
When they left, I varnished the prepared wood, cleaned out my brush, locked up, had lunch, and left for home at 1:30. Another good week of progress - at least by my standards.
©2009 Paul R. Martin, All rights reserved.
Go to Next Journal Entry
Previous Journal Entry
Index to all Journal Entries